Create an ESP32 BLE peripheral for iOS #2

This post is part two of a series targeted at helping mobile app developers build their own BLE Peripherals using inexpensive ESP32 hardware in less than 100 lines of code. This can help to more fully understand the BLE protocol. If you’re an iOS developer who would like to build their own BLE Peripherals for learning and exploring the full set of BLE features—or need to build a development simulator for a future device—this is the tutorial for you.
Introduction
This tutorial post is part two of a two-part series developing a Bluetooth BLE Peripheral to use for testing with iOS and Android applications.
- Part one covers creating a BLE peripheral using an Espressif ESP32 dev kit board using the Arduino IDE.
- Part two (this part) covers creating a SwiftUI iOS app that uses Core Bluetooth to connect and communicate with the ESP32 peripheral.
In this second part of the tutorial, we’ll walk through the steps needed to create the iOS application:
- Create a new SwiftUI application
- Create a Core Bluetooth-based BLE Central module within the iOS application.
- Implement functionality to read and write data to the ESP32 peripheral created in Part one, using the characteristics we coded in Arduino IDE.
- Configure the BLE Central as a SwiftUI ObservableObject, and use it as a View Model within the iOS application architecture.
Let’s get started!
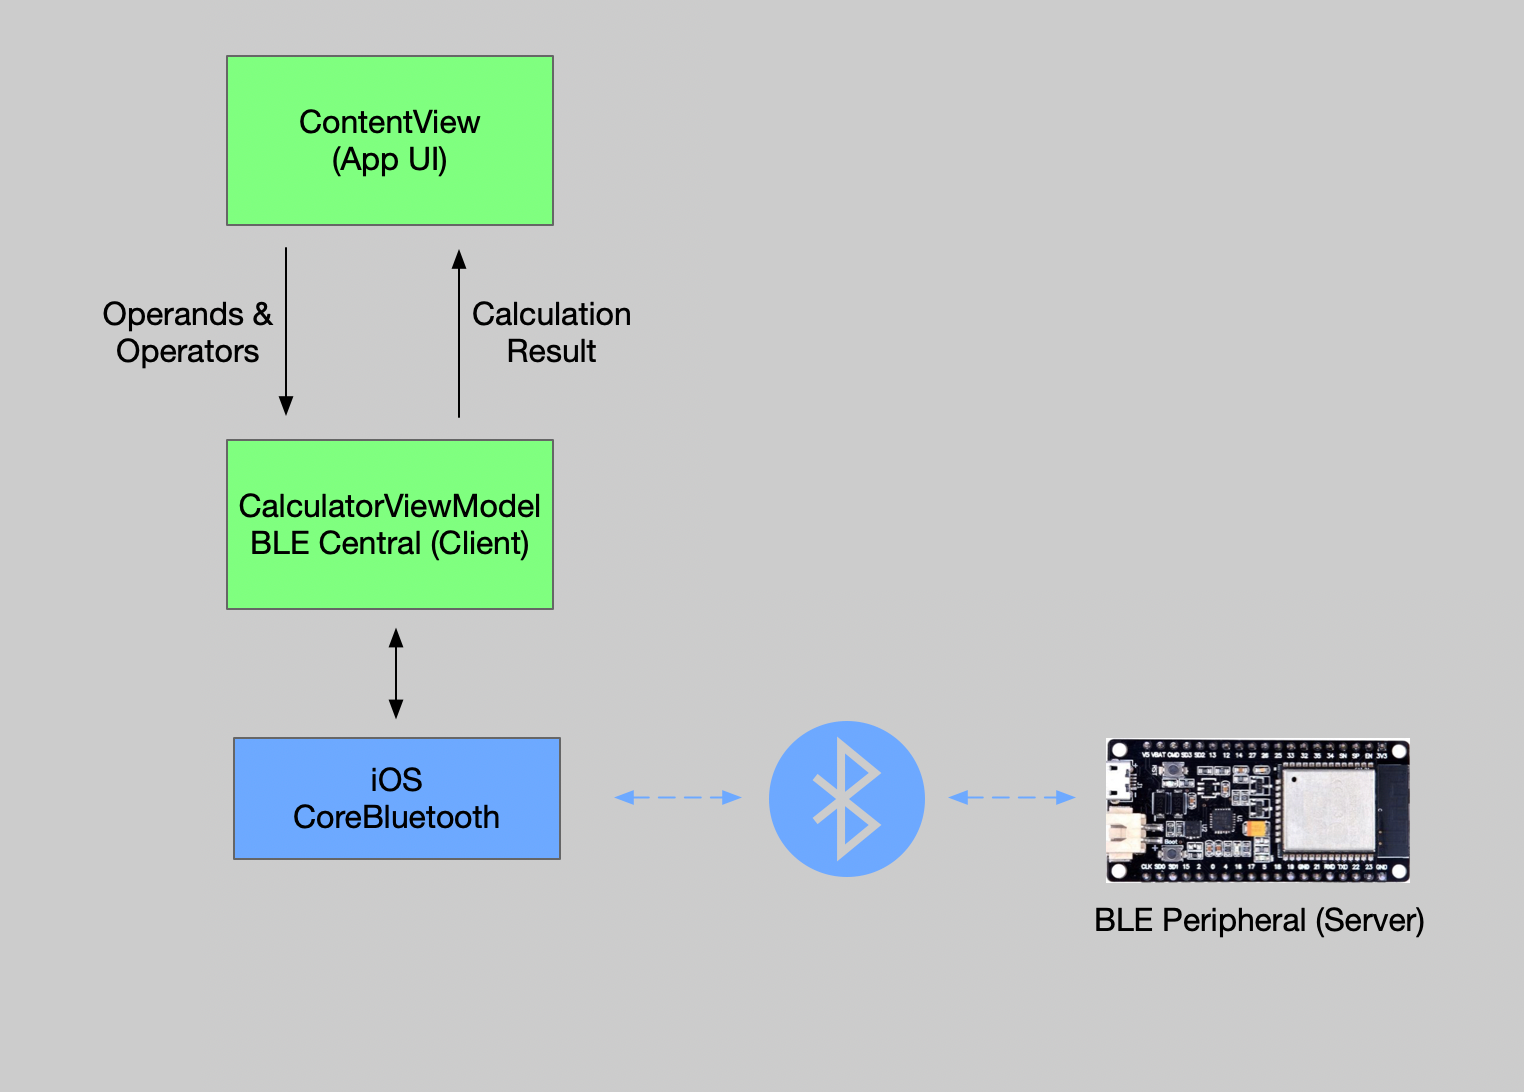
iOS App Architecture
iOS provides applications with Bluetooth services (including BLE services) via the built-in iOS Core Bluetooth framework. Apple provides a Core Bluetooth Programming Guide covering many of the details.
BLE applications generally will be implemented as one of two BLE roles:
- BLE Central. A Central Role consumes BLE services. An iOS device is usually a Central, connecting to one or many BLE services, such as headphones, keyboards, door locks, etc. A Central may also be referred to as a “Client”, as in a Client/Server computing model. A Central commonly connects to many Peripherals at the same time.
- BLE Peripheral. A Peripheral Role advertises services and allows connections from a Central. Keyboards, Mice and Headphones are peripherals. Our ESP32 test device is also a peripheral. A Peripheral is sometimes referred to as a “Server”. Usually a Peripheral can accept only one Central connection at a time.
This iOS Application will implement a Core Bluetooth Central role within a View Model. The View Model provides data from the ESP32 Peripheral to the UI, and sends calculation operands and operators from the UI to the ESP32 peripheral.
This diagram is an overview of the solution architecture:
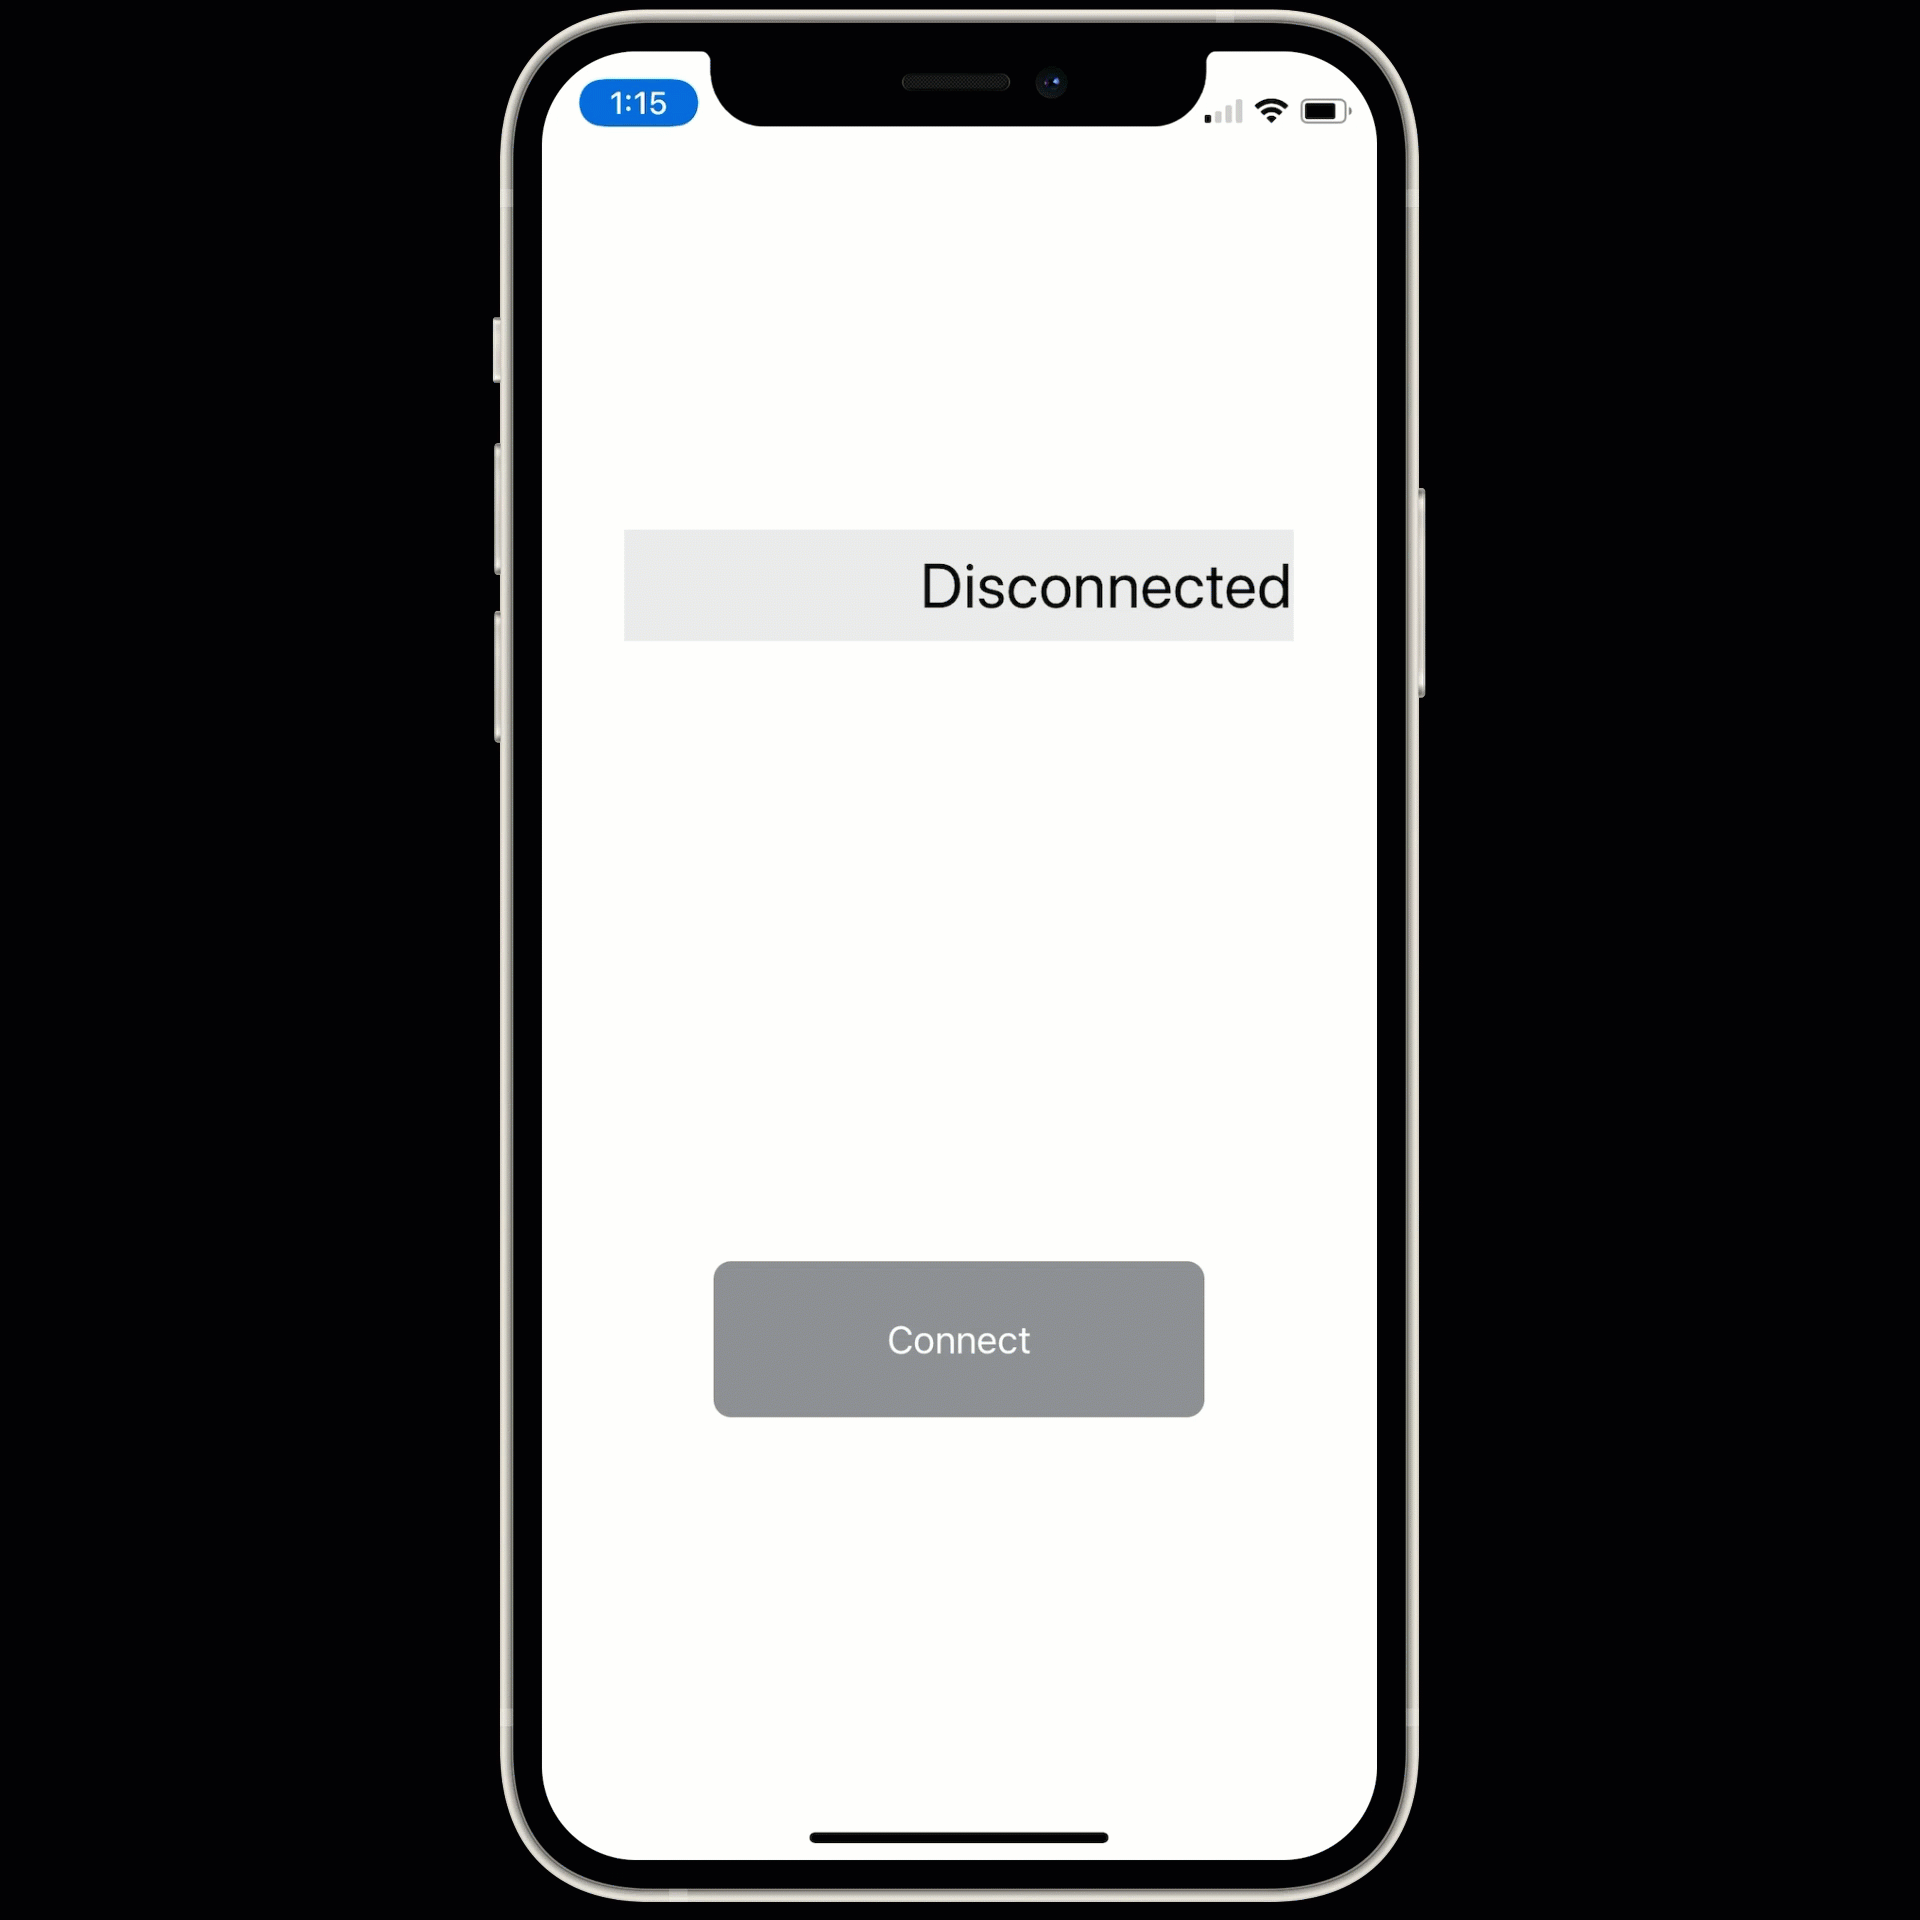
Application UI
The UI for the application (implemented using SwiftUI) is illustrated in the following diagram.
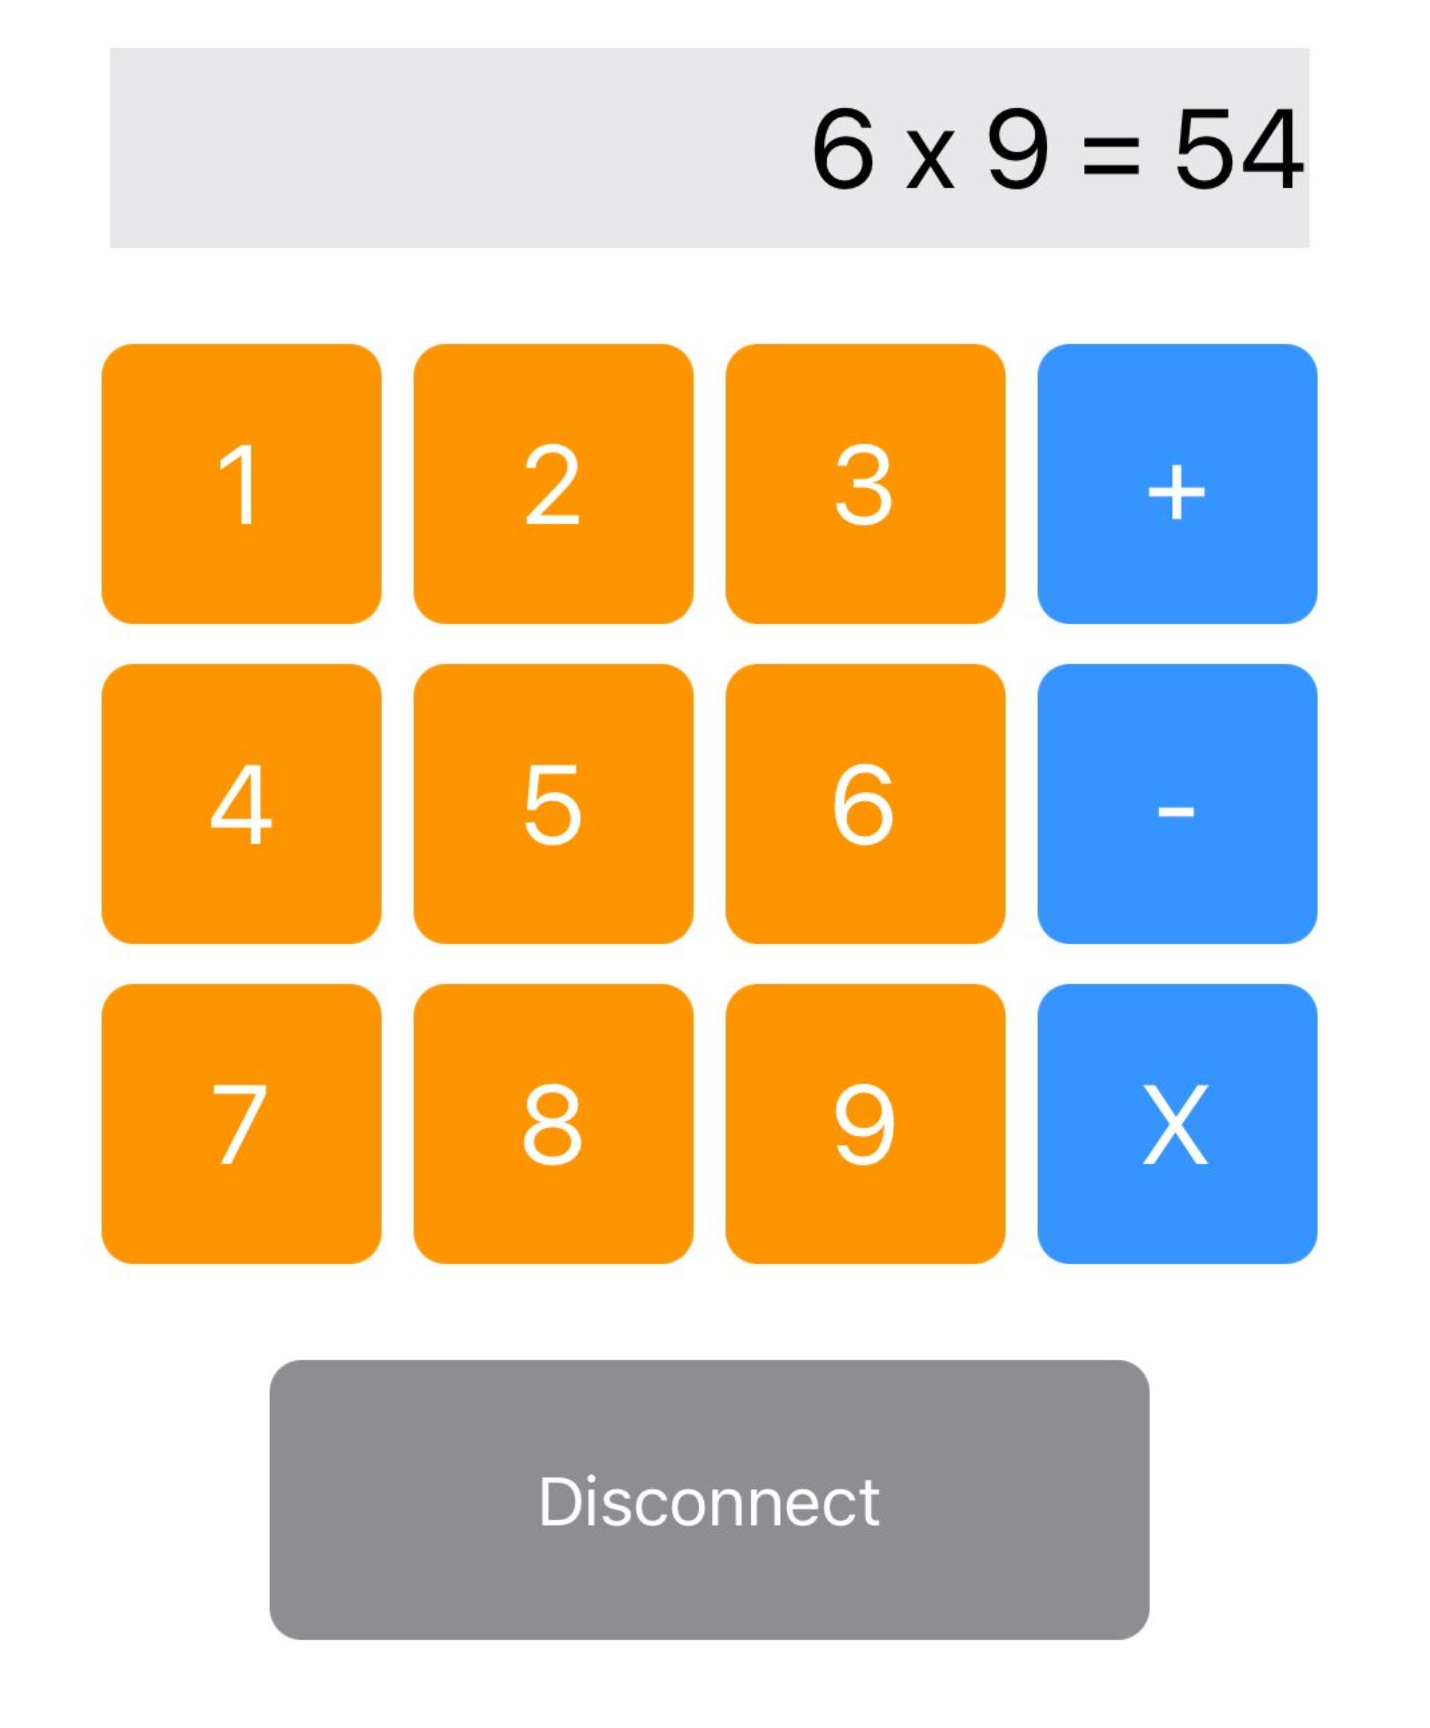
The user story is:
- The user first connects to the ESP32 peripheral by pressing the “Connect” button (which changes to a “Disconnect” button once connected).
- The user taps on a digit from 1-9, which becomes the first operand
- Next the user taps on a second digit, which becomes the second operand
- Finally the user taps on an operator (+, - or x).
- The ViewModel writes the two operands and the operator to the ESP32 peripheral via the input (write) characteristic, and then waits for a response.
- The ESP32 does the math, updates the answer (read) characteristic value, and notifies the app that the read characteristic has changed.
- The ViewModel updates a
@Publishedoutput variable, which is then displayed on the main UI screen above the keypad.
Create the Application
We’ll walk through the key steps one-by-one, but if you find it helpful to have the entire project open, here’s a link to it in my GitHub repo:
GitHub Repo with Complete BLECalculator SwiftUI project
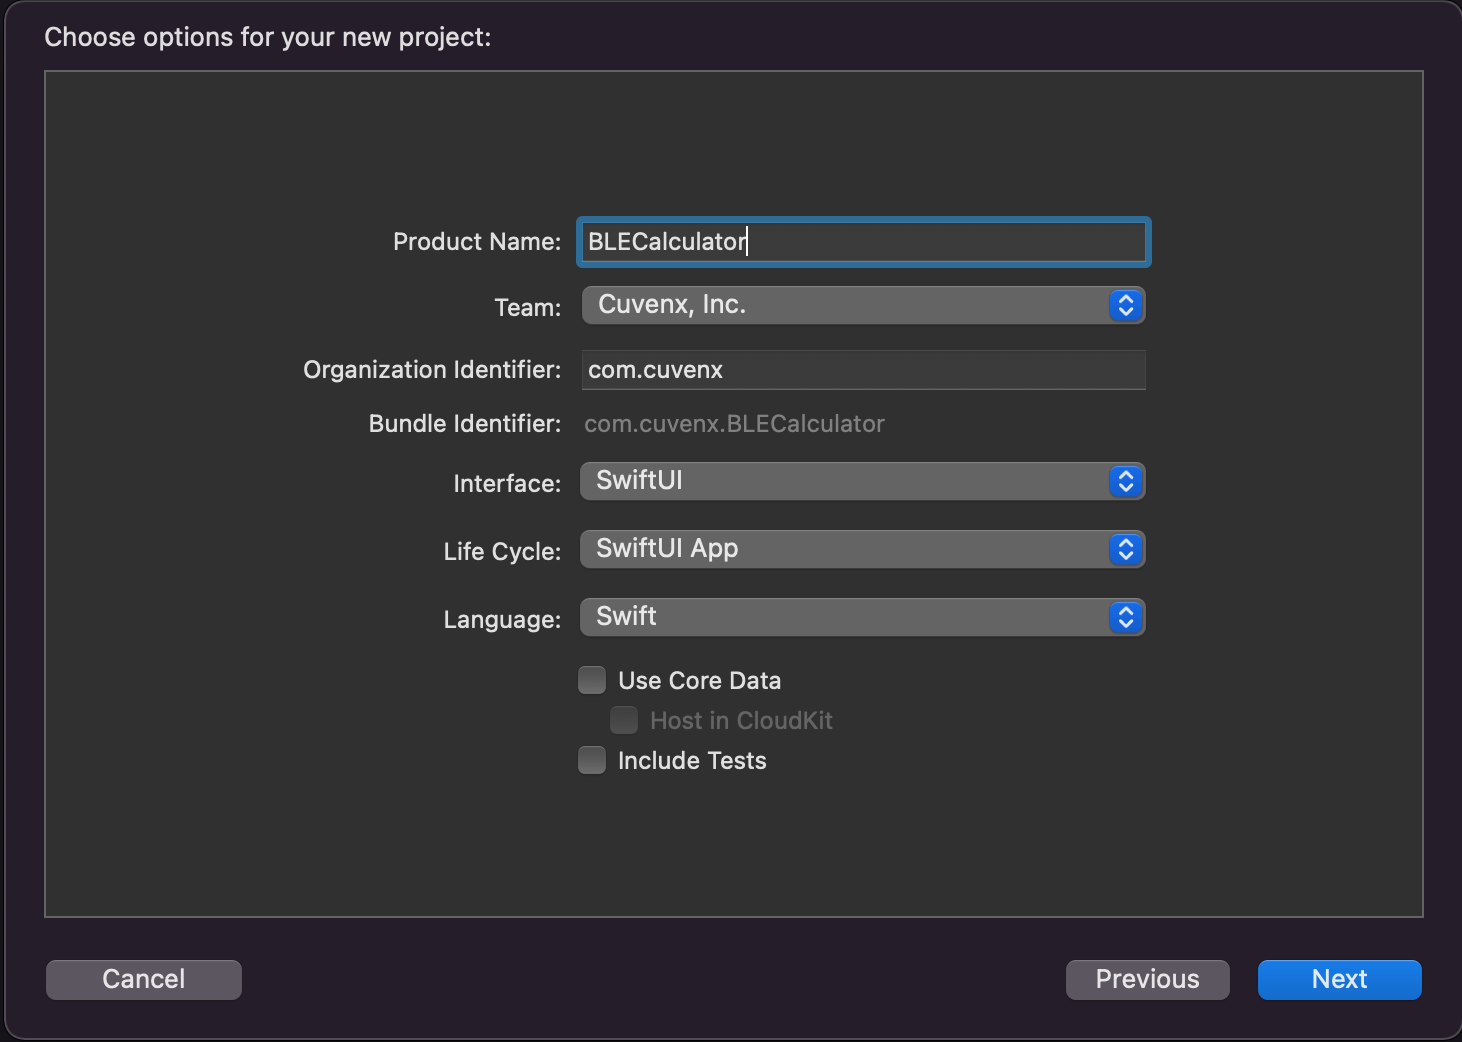
First create a new iOS SwiftUI Application, select SwiftUI for the Interface, and SwiftUI App for the lifecycle.
Update info.plist with BLE Privacy Settings
iOS requires user permission to use the Bluetooth radio, and requires applications that request permission to include two permission settings in the info.plist. Add these keys to your project.
    <key>NSBluetoothAlwaysUsageDescription</key>
    <string>This app uses Bluetooth to connect to the calculator peripheral.</string>
    <key>NSBluetoothPeripheralUsageDescription</key>
    <string>This app uses Bluetooth to connect to the calculator peripheral.</string>
info.plist Bluetooth Permission Settings
Omitting these permission strings will result in an application crash when the app calls for access to the Bluetooth radio.
Implement the View
Next create the SwiftUI View. The UI merely captures user entries and requests calculations from he View Model, and is not aware that the calculations are done by the remote BLE peripheral. We'll create the View Model in the next section.
The View implementation is implemented as follows:
import SwiftUI

struct ContentView: View {
    // 1
    @StateObject var viewModel = CalculatorViewModel()

    var body: some View {
        VStack {
            VStack {

            // 2
            Text(viewModel.output)
                .frame(width: 300,
                        height: 50,
                        alignment: .trailing)
                .font(.title)
                .background(Color.gray.opacity(0.2))
                .padding(.bottom)

            // 3
            KeypadView(viewModel: viewModel)

            // 4
            ConnectButtonView(viewModel: viewModel)

            }
        }
    }
}
- The View Model is created as a
StateObjectmember of the View. - The
Textview at the top of the form displays theoutputproperty from the CalculatorViewModel, which is a published property: - The
KeypadViewis a simple grid of buttons. Each button sends an event to the viewModel by calling a functionenterDigit(implemented in KeypadView.swift). - The ConnectButtonView displays a Connect/Disconnect button. It connects to the ESP32 peripheral by calling this method on the View Model:
viewModel.connectCalculator()
The a companion function to disconnect from the BLE peripheral:
viewModel.disconnectCalculator()
For full details of the UI implementation, check out the Swift source code on my GitHub repo:
Implement the BLE Central/View Model
The key BLE functionality of the solution is contained within View Model, which is also a BLE Central. I’ll explain this in much more detail than the View.
Basic ViewModel Structure
The basic shell of the View Model should be familiar, as it starts like any other @ObservableObject used as a View Model backing a SwiftUI view:
import Foundation

enum CalculatorOperation:UInt8 {
    case add, subtract, multiply
}

class CalculatorViewModel : NSObject, ObservableObject, Identifiable {
    var id = UUID()

    // 1
    @Published var output = "Disconnected"  // current text to display in the output field

    // 2
    @Published var connected = false  // true when BLE connection is active

    private var operands:[UInt8] = [0x00, 0x00, 0x00]  // operand1, operand2, operation

    // 3
    func enterDigit(_ digit: Int) {
            if operands[0] == 0x00 {
            operands[0] = UInt8(digit)
        } else {
            operands[1] = UInt8(digit)
        }

        output = "\(operands[0]) ? \(operands[1]) = ?"
}

    // 4
    func send(_ operation: CalculatorOperation) {
      // TODO: Check that BLE is connected

        output = "Calculating..."
        switch operation {
            case .add: operatorSymbol = "+"
            case .subtract: operatorSymbol = "-"
            case .multiply: operatorSymbol = "x"
        }

        operands[2] = operation.rawValue

        // TODO: write the operands array to the ESP32 Write Characteristic
    }

    // TODO: implement BLE Central to write commands to ESP32, and listen for updates to calculator output
}
Most of this code should be familiar. The key functional points are:
- A
@Publishedvaroutput, which when changed will also change theTextfield in the View - A
@Publishedvarconnected, which signals whether the iOS device is connected to the ESP32 device or not. This is used to hide the keypad when not connected to the ESP32 device. - The
enterDigit()method called when the user presses a digit 1-9 on the keypad. - The
send()method is called when the user taps an operator (+, -, x). In the final View Model, this method will write data to the ESP32 device via BLE.
The BLE Peripheral Connection Process
Next we’ll add the code to find, connect to and begin working with the ESP32 peripheral. First I’ll explain the connection process at a high level—virtually all BLE Centrals (whether iOS or Android or any other platform) share the same basic connection steps. If you’re already familiar with BLE connection steps and delegates, you can skip this section.
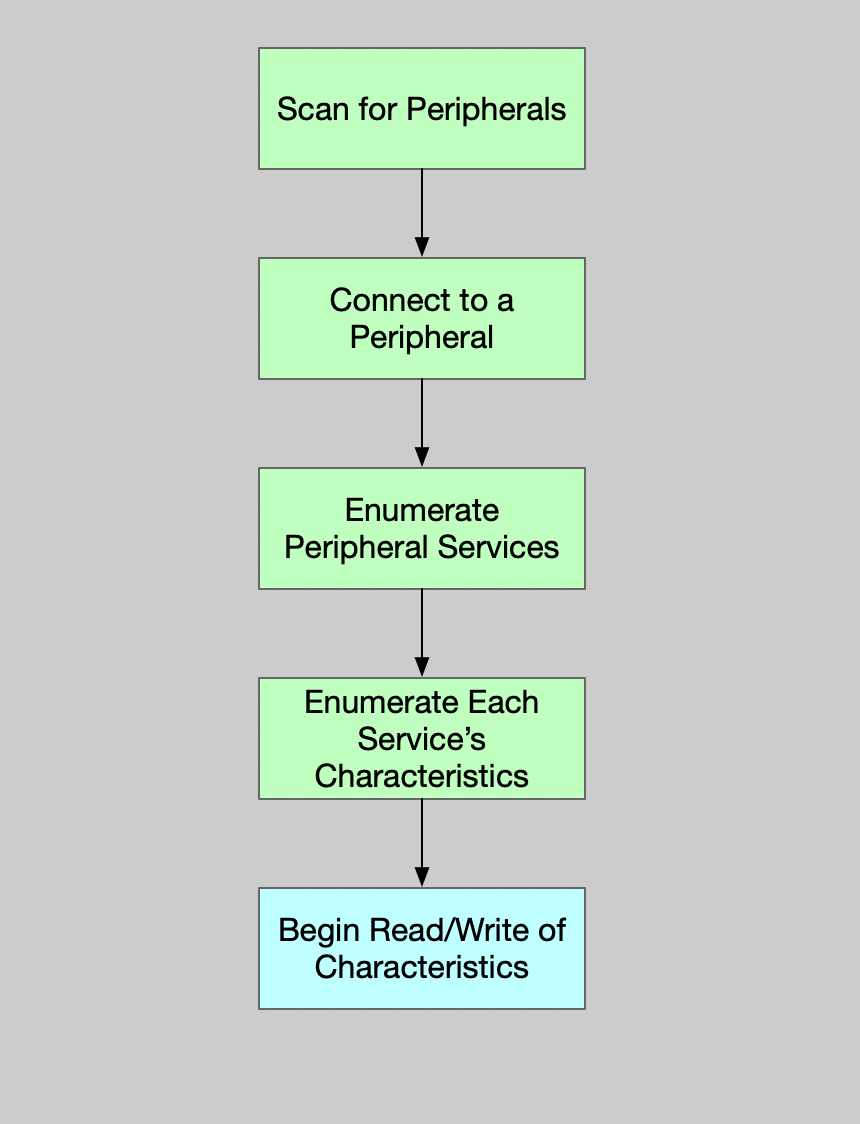
- Scan. A central begins the connection process by scanning for peripherals. While it is possible to scan and view every BLE Peripheral currently advertising it services, it’s not typical. Usually an application will filter the scan to just Peripherals that advertise the specific services it plans to use. Recall we created a unique UUID for the ESP32 Calculator, and we’ll filter the iOS scan to this UUID only.
- Connect. After enumerating the Peripherals that match some UUID filter, connect to the desired peripheral. Often a user will choose the device to connect from a list. In this test application, we’ll connect to the first peripheral we find without user confirmation (because we know there’s only one).
- Enumerate Services. Once connected, the application will enumerate services available. Recall that our ESP32 peripheral has only one service, so this enumeration will return only one service, identified by its UUID.
- Enumerate Characteristics. For each service, the application will enumerate available characteristics, saving handles to each.
- Subscribe to Notifications. If it makes sense for the app to subscribe to one or more read notifications, this can be done as the characteristics are enumerated.
- Operate. After all connection and negotiation is complete, the app can start reading, writing, and monitoring notification updates from the BLE peripheral.
In the next section, I’ll cover the code that accomplishes each of these connection steps. The overall code for the BLE Central protocols in the View Model may seem daunting at first, but after studying the code for each step below, reviewing the entire View Model source file will make sense.
Bear in mind that everything happening in the View Model/BLE Central is actually the “other end” of the conversation you implemented in the ESP32 Arduino code. The central is more complex, but it fits together with the ESP32 characteristics and operations.
Connecting to the ESP32 Peripheral
When the user taps the Connect button, the view calls the connectCalculator() method.
func connectCalculator() {
    centralQueue = DispatchQueue(label: "test.discovery")
    centralManager = CBCentralManager(delegate: self,
                                      queue: centralQueue)
}
When this method creates a new CBCentralManager, this has the effect of turning the BLE radio on.
When the BLE radio powers up, iOS sends a delegate call back to our View Model, which implements the CBCentralManagerDelegate protocol.
func centralManagerDidUpdateState(_ central: CBCentralManager) {
        if central.state == .poweredOn {
            central.scanForPeripherals(withServices:
                            [serviceUUID], options: nil)
    }
}
When we receive a BLE radio .poweredOn event notification, we respond by asking iOS to scan for any peripherals advertising a service with the UUID defined in the ESP32 code.
For each peripheral advertising the desired service, iOS notifies us via another delegate method:
func centralManager(_ central: CBCentralManager,
                didDiscover peripheral: CBPeripheral,
                advertisementData: [String : Any],
                rssi RSSI: NSNumber) {

    central.stopScan()
    connectedPeripheral = peripheral
    central.connect(peripheral, options: nil)
}
Since we know only one ESP32 test device will be in range, here we just tell CBCentralManager to stop scanning, and connect to the first peripheral.
Make sure to save a class-level reference (connectedPeripheral). If the peripheral object passed into this function goes out of scope at the end of this delegate method without being assigned to another variable, further communication with the peripheral will be restricted.
Often in production apps, we would allow the user to select from a list of found devices.
When iOS completes the connection to the ESP32 peripheral, it calls us back yet again, with confirmation that the connection is established.
func centralManager(_ central: CBCentralManager, didConnect peripheral: CBPeripheral) {

    peripheral.delegate = self
    peripheral.discoverServices(nil)

}
Knowing that the connection is established, we use the .discoverServices(nil) method on the peripheral object to ask iOS to inspect the peripheral, returning a list of all Services it supports.
Again, iOS will call us back via a CBPeripheralDelegate protocol method, providing a list of all services that were discovered.
func peripheral(_ peripheral: CBPeripheral, didDiscoverServices error: Error?) {
    guard let services = peripheral.services else {
            return
    }

    for service in services {
        peripheral.discoverCharacteristics(nil, for: service)
    }
}
Then for each service, we ask iOS to fetch a list of all characteristics available for that service.
If this seems a bit tedious, hang in there—we’re almost done!
As you probably guessed by now, iOS will call us back once for each service. If there are characteristics for a service, they can be enumerated, and handles saved.
func peripheral(_ peripheral: CBPeripheral, didDiscoverCharacteristicsFor service: CBService, error: Error?) {
    // 1
    guard let characteristics = service.characteristics else {
        return
    }

    for ch in characteristics {
      switch ch.uuid {
          case inputCharUUID:
              // 2
              self.inputChar = ch
          case outputCharUUID:
              self.outputChar = ch
              // 3
              peripheral.setNotifyValue(true, for: ch)
          default:
              break
        }
    }

    // 4
    DispatchQueue.main.async {
        self.connected = true
        self.output = "Connected."
    }
}
- The service list is optional, we need to check whether it’s nil at // 1
- We’ll need handle the
inputCharin order to write data to that characteristic later - For the output characteristic (the “read” characteristic), we need to enable notifications. This will ensure we receive data updates as they happen without need to poll the characteristic. Recall from Part 1 we used the
notify()function to send these notification updates after a calculation was completed. - Now that we have all characteristics, we can enable the UI for the user to start using the calculator peripheral. This will show the keypad and indicate the connection status.
Using the BLE read/write characteristics
As you can see in the last section, the process of establishing a client (Central) connection to a BLE Peripheral is somewhat tedious, and involves a lot of asynchronous communication. Once the connection is up, and the characteristics are identified, using BLE services is made of straightforward reads and writes.
Sending operands and operators to the BLE Peripheral Service
Previously we looked at the send() method within the View Model, which finalizes the byte array to send to the peripheral’s service. To send that data is add one line of code at the bottom of the function:
func send(_ operation: CalculatorOperation) {
    // 1
    guard let peripheral = connectedPeripheral,
          let inputChar = inputChar else {
              output = "Connection error"
          return
    }

    output = "Calculating..."
    switch operation {
      case .add: operatorSymbol = "+"
      case .subtract: operatorSymbol = "-"
      case .multiply: operatorSymbol = "x"
    }

    operands[2] = operation.rawValue

    // 2
    peripheral.writeValue(Data(operands),
                      for: inputChar, type: .withoutResponse)
}
- At I’ve added some error checking to ensure that this method will fail fast in the case that the BLE connection has dropped or wasn't properly initialized.
- At the actual write code is added here. This code writes the 3 byte array to the write characteristic, and specifies that the Central (this object) doesn’t expect a confirming response.
Write modes (with/without response) must be enabled via the configuration in the Peripheral code. In Part 1 we allowed both write types.
Monitoring for Calculation Output
Because we called peripheral.setNotifyValue()on the read characteristic used to send calculator output back to the app, we don’t need to explicitly ask the remote BLE peripheral for the output value. Each time the peripheral changes the value, it calls its own notify() function (recall we added that to the ESP32 code in Part 1).
When the peripheral calls notify() on the read characteristic, iOS will use a protocol callback method to let us know the value has changed, and what the new value is:
func peripheral(_ peripheral: CBPeripheral, didUpdateValueFor characteristic: CBCharacteristic, error: Error?) {

  // 1
  if characteristic.uuid == outputCharUUID,
      let data = characteristic.value {

        // 2
        let bytes:[UInt8] = data.map {$0}

        if let answer = bytes.first {
          // 3
          DispatchQueue.main.async {

              // 4
              self.output = "\(self.operands[0]) \(self.operatorSymbol) \(self.operands[1]) = \(answer)"

              // 5
              self.operands[0] = 0x00
              self.operands[1] = 0x00
          }
        }
      }
}
- Check to make sure that the characteristic that was updated is in fact the read characteristic we expected.
- Convert the Foundation Data object to a simple array of
UInt8so we can access its members by index. - Check if there is at least one byte (assume nothing since the data is being sent from a remote device!)
- Format the text that the user will see as the response from the remote peripheral.
- Clear the operands, so the user can begin the next calculation with empty values.
Disconnecting from the Peripheral
When the user taps the Disconnect button, the application asks the CentralManager to cancel the connection to the peripheral.
    func disconnectCalculator() {
       guard let manager = centralManager,
             let peripheral = connectedPeripheral else { return }

       manager.cancelPeripheralConnection(peripheral)
    }
After the disconnect, iOS will notify us the connection is dropped by calling—yes another delegate method!
    func centralManager(_ central: CBCentralManager, didDisconnectPeripheral peripheral: CBPeripheral, error: Error?) {

       centralManager = nil

       DispatchQueue.main.async {
          self.connected = false
       }
    }
When self.connect is changed to false, the keypad will be hidden.
Review the Full View Model
We’ve reviewed all the small pieces of the View Model (which doubles as a Core Bluetooth BLE Central). Now is a good time to review the full source for the View Model, to see how all the individual pieces fit together.
CalculatorViewModel.swift on GitHub
Final App Operation
Here’s a demo of the final operation of the UI.
In the demo you can see the following steps being completed:
- When the user taps on the Connect button, the app connects to the ESP32 peripheral via Bluetooth, and the keypad is made visible.
- The user taps in two numbers, then an operand. The app then sends the calculation request via the Write characteristic, and waits for the read characteristic notification signal.
- When the read characteristic notifies that the value changed, the app formats the output and displays it to the user.
- Finally, the user taps the Disconnect button, which cancels the BLE Peripheral connection from the App side of the connection. When the BLE connection disconnects, the keypad is hidden.
Monitoring from the ESP32 side of the connection
In Part 1, we used the Arduino Serial Monitor to watch the console output from the ESP32 peripheral firmware. Below is the output from the ESP32 side as the above Final App Operation demo completes.
Note the output values below are in hexadecimal, so the first response of 0x36 is 54 in base 10.
    Begin Setup BLE Service and Characteristics
    BLE Service is advertising
    BLE Client Connected
    Multiplying:   09 06
    Sending response:   36
    Adding:   05 03
    Sending response:   08
    Subtracting:   09 02
    Sending response:   07
    BLE Client Disconnected
By using the Arduino environment, it becomes quite easy to watch both sides of the BLE connection at the same time!
Completed Code
Here’s a GitHub link with the full source code for both the SwiftUI and ESP32 BLE programs.
Summary
In this BLE tutorial part two, we created an iOS application using SwiftUI that connects with the ESP32 BLE peripheral created in Part 1. Taking both parts together, you have the tools and code to build BLE peripheral services using microcontroller hardware.